## Signed URL 설정 방법 (일반 URL 작동, Cloudfront URL 작동 안함)
1) Cloudfront 에서 2가지 작업 필요
- Enable viewer restrictions (yes)
- Setup Trusted signer (Self)
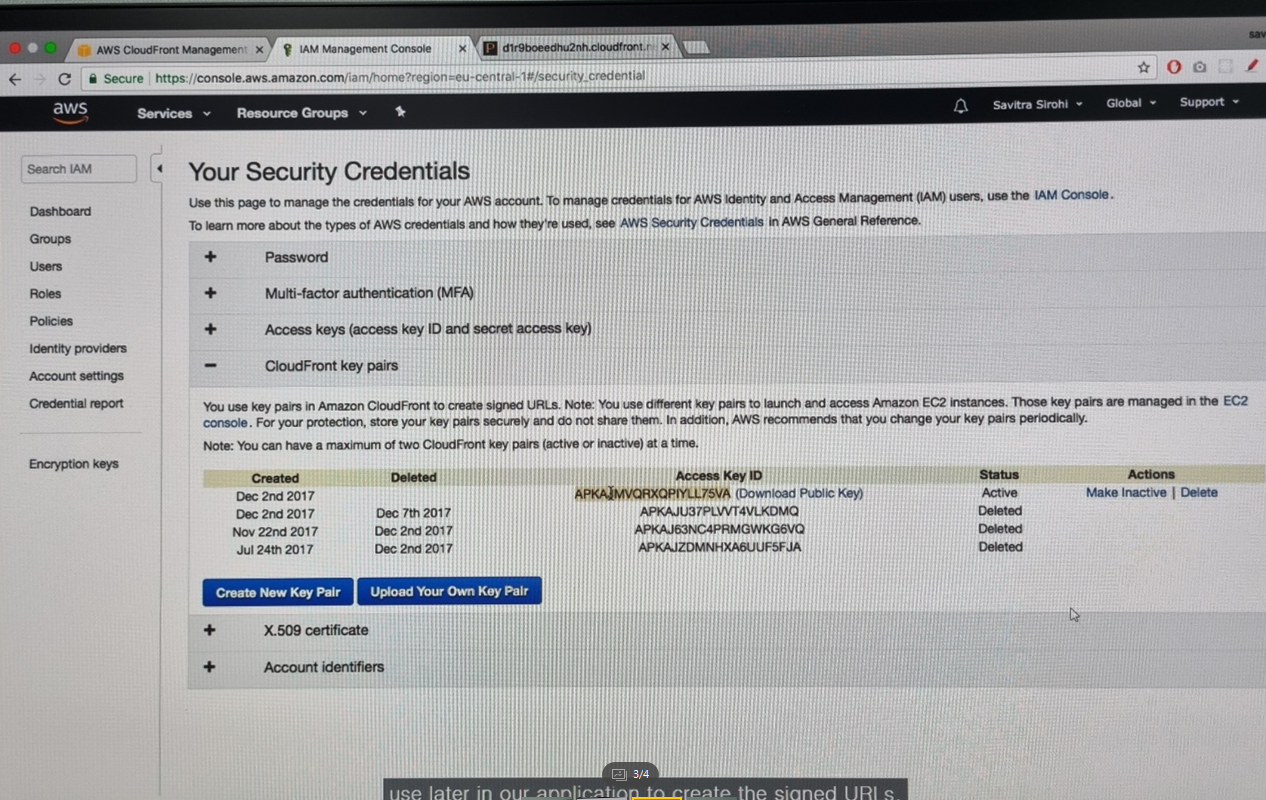
2) 내보안 자격증명 이동
- Create Cloudfront key pair 생성 (APP 사용 예정)


So in this video let's see how do restrict viewer access.
Right.
And essentially what we're trying to do is turn on or enable signed URLs.
Right.
So after we are done with this configuration regular URLs the ones you've been using so far
will not will not work.
So if you try to set an image using the plain URLs this will not work and only signed URLs
will work.
OK so that's the that's the bit that we're trying to do in this particular video.
So we have to do two things in the cloud front configuration.
So this is the cloud front distribution and and there are some configuration fields that we will change
and essentially the first one is very simple just a simple radio button enable viewer restrictions.
And along with that we'll have to specify the trusted signer.
This is the AWS account that will sign right the account that is authorized to sign.
And usually this is set to self right which means the same AWS account in which the distribution
exists will be able to sign the URLs.
Ok it's very simple change we have to do.
And separately we'll have to create a key pair and this key pair the private key of this pair.
We will use to sign URLs.
And we have to configure that in our application.
which we will do later.
But at the moment what we have to do is from the AWS account account settings right.
So security settings under under this.
So under the security settings we'd have to create what is called a cloud front.
key pair right cloud front key pair and we'll use the the private key private key of this pair along with
the key par ID the keypair ID we have to configure these in our application.
right.
So these will be configured in our application PHP application right.
So these are some steps we need to do to prepare for using signed URLs in our application.
Right.
But even here we have a verification step.
This is something you can do and which is that once you have completed the configuration verify by trying
the URL of the image the cloud front URL of the image right which is which is essentially
something like this.
The cloud front DNS DNS name right.
Followed by the image followed by the image that you have.
Right.
So so.
So this would normally work.
But now this would stop working.
This will stop working because we want to use signed URLs.
And this is just a plain URL right so this will not work.
And you can verify this much right you can verify this much andthis means we have set up the signed
URL configuration.
OK.
Correct so.
So lets see how to do this and set up signed.
URLs
all right here's our cloud front distribution and let's go into the distribution settings.
And if you go to behaviors right if you go to the behaviors tab and edit edit the record that we have
there you will see if you just scroll down you'll find a field here called restrict viewer access.
Right.
And this basically means this is something that should be set to yes if you are using signed URLs
or signed cookie signed cookies as well.
So.
So make sure that this is set to Yes.
Normally.
The default is no right so normally.
You'll see something like this.
Make sure that that is set to Yes.
OK.
Also the trusted signers should be said to set to Self for the moment.
Right because we'll be using the same AWS account this account to sign the URLs.
So these two these two changes you have to make and once you click on edit it will take some time for
the configuration changes to to take effect.
Right.
But once you do that you can try out the URL of the image.
Right so this is let's say the domain name of the cloudfront distribution.
Right.
And normally you'll be able to fetch the image by doing something like this.
So if you were to say something like this you would see the image right but now.
Once this configuration change has taken effect you'll find this kind of error where it says look
it's expecting a signed URL.
And we are not really providing the signed URLs and we're trying to fetch the image with the plain.
URL.
OK so this is the verification step that you can do.
So essentially right once we enable viewer restriction once we set up the trusted signer we can verify
that the regular URL will stop working right this will stop working.
OK.
All right.
Separately we have to take care of this as well which is essentially creating a cloud front key
pair which we can use in our application to to create the signed URL's right so here what you
have to do is from account from the menu on the top like this.
Right.
Go into my security credentials right.
And here you will find in this page cloud front key pairs something like this like something like this.
So all you have to do is click on this button create a new key pair and you will download the private
key.
You'll download the private key and this will have an extension dot pem and it will
also include the key ID.
Right so this ID dot pem will be the name of the file that you will which you will download.
And this the key pair I.D. This highlighted bit here along with the private key is something we will
use later in our application to create the signed URLs.
All right.
OK.
So so I hope this is clear.
Essentially we are setting up sign URLs setting up your viewer restrictions such that only those
users who have signed URLS can access our content.
And we have to make some changes in the cloud front configuration.
And separately we have to create a cloudfront key pair for use in our application.
OK.
And don't forget to verify that the regular cloud front URL is no longer working.
Good luck.
'[AWS] > Highly Available, Scalable, AWS Stack' 카테고리의 다른 글
| 35. Intro: Deployment (0) | 2022.02.01 |
|---|---|
| 34. [활용] Configure & verify app (0) | 2022.01.31 |
| 32. [활용] Restrict S3 access (0) | 2022.01.31 |
| 31. Intro: Private content (0) | 2022.01.25 |
| 30. [활용] Configure and verify app (0) | 2022.01.25 |


댓글