www.youtube.com/watch?v=PZ0xMLjvPhI&t=494s
github.com/awstechguide/scripts/blob/master/nexus-install-in-ubuntu.md
update packages
sudo apt-get update
install openjdk 8
sudo apt install openjdk-8-jdk

change user to sudo
sudo su
browse to /opt. where we will install nexus
get nexus binary
(에러시 잠시 후에 재시도)
wget https://sonatype-download.global.ssl.fastly.net/nexus/3/nexus-3.24.0-02-unix.tar.gz
tar -zxvf nexus-3.24.0-02-unix.tar.gz
mv /opt/nexus-3.24.0-02 /opt/nexus


add user. (best practice to avoid root user. create new user)
sudo adduser nexus

add priviledge to new user
visudo
###add nexus ALL=(ALL) NOPASSWD: ALL


change ownership to new user
sudo chown -R nexus:nexus /opt/nexus
sudo chown -R nexus:nexus /opt/sonatype-work

update /opt/nexus/bin/nexus.rc file, just uncomment run_as_user
vi /opt/nexus/bin/nexus.rc
run_as_user="nexus"


Add nexus as a service at boot time
sudo ln -s /opt/nexus/bin/nexus /etc/init.d/nexus


start nexus
/etc/init.d/nexus start

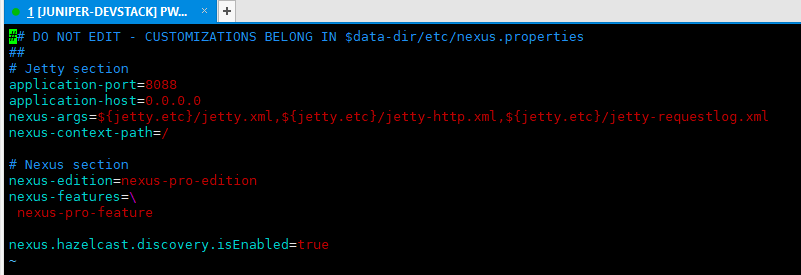
- 포트 충돌로 포트 변경 (기본 8080 -> 8088)
- sudo vi /opt/nexus/etc/nexus-default.properties

- 웹 접속 성공 (http://IP:8088)

포트에서 실행중인 서비스 확인
netstat -nlpt
아래와 같이 보여야합니다
Proto Recv-Q Send-Q 로컬 주소 외부 주소 상태 PID / 프로그램 이름
tcp 00 0.0.0.0:8081 0.0.0.0:* 듣기-
tcp 00 0.0.0.0:22 0.0.0.0:* LISTEN-
tcp
00 127.0.0.1:36665 0.0.0.0:* LISTEN- tcp60 0 ::: 22 ::: * LISTEN-
http : // nexuxserver url : 8081 (기본값 8081). 보안 그룹 (AWS 용) / 네트워크 규칙 (Azure 용) / 수신 규칙 (GCP 용)에 8081 포트가 있는지 확인합니다.
로그인 설정
로그인하려면 아래 자격 증명을 사용하십시오.
사용자 이름 : 관리자
경로 /opt/sonatype-work/nexus3/admin.password에서 초기 암호를 가져옵니다.
nexus 서버에서 cat /opt/sonatype-work/nexus3/admin.password를 실행합니다.
Use below credentials to login
username : admin
get initial password from path /opt/sonatype-work/nexus3/admin.password
run cat /opt/sonatype-work/nexus3/admin.password in your nexus server.


pull artifact from nexus to jenkins and deploy to tomcat
in JENKINS build job write below shell script to pull artifact
wget --user= --password= <nexus artifact url (war/ear)>
wget --user=admin --password=admin http://35.184.138.42:8081/repository/maven-snapshots/awstechguide/spring-webapp/1.0.0-SNAPSHOT/spring-webapp-1.0.0-20200703.145607-1.WAR
넥서스에서 젠킨스로 아티팩트를 가져 와서 바람둥이에 배포
JENKINS 빌드 작업에서 셸 스크립트 아래에 작성하여 아티팩트를 가져옵니다.
wget --user = --password = <nexus artifact url (war / ear)>
wget --user = admin --password = admin http://35.184.138.42:8081/repository/maven-snapshots/awstechguide/spring-webapp/1.0.0-SNAPSHOT/spring-webapp-1.0.0-20200703.145607-1 .전쟁
'기타' 카테고리의 다른 글
| Pull artifact from NEXUS and deploy to tomcat using JENKINS (0) | 2020.12.27 |
|---|---|
| Integrate Nexus with Jenkins [Nexus와 Jenkins 통합] (0) | 2020.12.26 |
| [개발지식] Nexus Repository 란? (0) | 2020.12.23 |
| 윈도우 10 에서 ping 가능하게 설정 하는 방법 (방화벽) (0) | 2020.12.21 |
| 리눅스 make 란? (0) | 2020.11.25 |


댓글